Planting Recommendations
Site Selection: Upland soils preferred. Hulless Barley, we found in 2011, does very poorly in heavy, wet soils.
Planting Dates: Barley and Wheat planting dates are quite acceptable.
Calibrate: Be sure to calibrate your grain drill. There is no setting in your grain drill box for hulless barley. Use wheat settings as a starting point.
Seeding Rate: Until more information is available, we recommend 150 lbs/acre.
Planting Depth: ¾” to 1 ¼”, up to 1 ½” in no-till. Please note we find that the hulless barley is not quite as vigorous as wheat.
Fertilization: It is important to apply 30 units of N in the fall. This will help promote tillering. In the spring you should apply an additional 8/10 to 1 lb of N per bushel of your expected yield goal. This N should be split applied in the early spring, on fields that have low tiller counts (below 35 tillers per foot of row), it is recommended 70% of the total N need be applied just before green-up. If the grower has optimum fall tillering (35 tillers/ft of row) apply 30% of your spring N just prior to green up. The remaining N should be applied at Feekes growth stage 5. (See growth chart.) Apply phosphorus and potash as recommended by your soil test.
Pesticides: Harmony XTRA is recommended for spring weed control. Some growers are adding a ½ rate of Headline fungicide with their Harmony application. An application of Prosaro is recommended for head scab. This would be applied at growth stage 10.5. Or you may use Follicur at the same growth stage. If the farmer notes the presence of leaf disease, he should apply a fungicide at flagleaf.
Harvest: Hulless barley, like wheat, will be ready for harvest one time and every subsequent rain will lessen its quality. Make every effort to be timely with your harvest. The grain will reach maturity and the straw may still have some life in it. Remember, harvest when the grain is ready, not the straw.
Combine settings: You should use the wheat settings on your combine as a starting point for thrashing your hulless barley. You may find it necessary to close your cylinder or increase your cylinder speed. You may find it requires a
little more care when setting up your combine.
Physiological Feekes Growth Stages in Winter Wheat
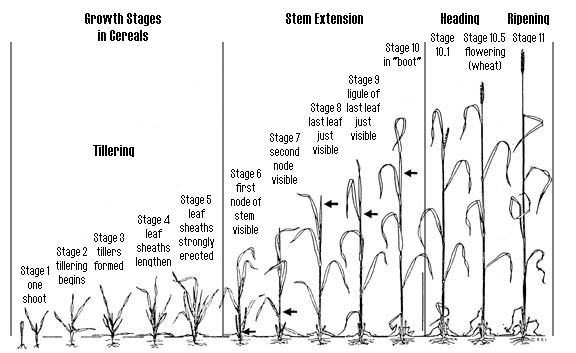
According to Large (1954) cereals develop as follow Feekes Growth Stages
Stage
TILLERING
1 One shoot (number of leaves can be added) = “brairding”
2 Beginning of tillering
3 Tillers formed, leaves often twisted spirally. In some varieties of winter wheats, plants may be “creeping” or prostrate
4 Beginning of the erection of the pseudo-stem, leaf sheaths beginning to lengthen
5 Pseudo-stem (formed by sheaths of leaves) strongly erected
STEM EXTENSION
6 First node of stem visible at base of shoot
7 Second node of stem formed, next-to-last leaf just visible
8 Last leaf visible, but still rolled up, ear beginning to swell
9 Ligule of last leaf just visible
10 Sheath of last leaf completely grown out, ear swollen but not yet visible
HEADING
10.1 First ears just visible (awns just showing in barley, ear escaping through split of sheath in wheat or oats)
10.2 Quarter of heading process completed
10.3 Half of heading process completed
10.4 Three-quarters of heading process completed
10.5 All ears out of sheath
FLOWERING (WHEAT)
10.5.1 Beginning of flowering (wheat)
10.5.2 Flowering complete to top of ear
10.5.3 Flowering over at base of ear
10.5.4 Flowering over, kernel watery ripe
RIPENING
11.1 Milky ripe
11.2 Mealy ripe, contents of kernel soft but dry
11.3 Kernel hard (difficult to divide by thumb-nail)
11.4 Ripe for cutting. Straw dead
